Revised
for RTM, March PU, August CU; Office Developer Tools RTW
This
guide is divided into 3 main sections:
A. Prerequisites
Follow this guide to prepare a development environment for Sharepoint
2013: http://msdn.microsoft.com/en-us/library/fp179923(v=office.15).aspx.
The MSDN guide does not provide an accurate account of how the configurations
should be performed. Where applicable, please follow the missing or existing
failed procedures detailed in the above MSDN guide with the steps below.
A1. Configurations to allow remote
computer access – required when the target SP2013 instance is on a
remote computer
Creating an Alternate
Access Mapping (AAM)
From Central Admin, navigate to System Settings ->
Configure alternate access mappings. Click on the link “Edit Public URLs” to
add a URL for Sharepoint server as follows (Fig 1) with its LAN IP (i.e.
http://10.7.8.161) . Note that the IP address assigned to your target
Sharepoint server may be different. Please change accordingly.
Figure 1

A2. Creating a new developer site
From Central Admin, navigate to Application Management ->
Create Site Collection. Fill in the required fields as follows (Fig 2) and
click OK to create a new site collection for the developer site. This will
create a new developer site under /sites/dev.
Figure 2

A3. Create an isolated app domain on
your development computer (machine running Sharepoint 2013)
From the target sharepoint computer, run the following
PowerShell commands with the Sharepoint Management Shell.
A3-1. Create an App
Domain
Start-Service SPAdminV4
Start-Service SPTimerV4
Set-SPAppDomain -AppDomain
"SP2013.com"
A3-2. Running Shared
Services Instances
Get-SPServiceInstance |
Where-Object {$_.GetType().Name -eq "AppManagementServiceInstance"
-or $_.GetType().Name -eq "SPSubscriptionSettingsServiceInstance"} |
Start-SPServiceInstance
Get-SPServiceInstance |
Where-Object {$_.GetType().Name -eq "AppManagementServiceInstance"
-or $_.GetType().Name -eq "SPSubscriptionSettingsServiceInstance"}
A3-3. App-specific
Shared Services Applications
(Use the following steps if the central admin wizard has
been run)
$applicationPool =
Get-SPServiceApplicationPool -Identity "SharePoint Web Services
System"
$appSubscriptionService =
New-SPSubscriptionSettingsServiceApplication -Name "Subscription Settings
Service" -DatabaseName "SubscriptionSettingsServiceDB"
-ApplicationPool $applicationPool
New-SPSubscriptionSettingsServiceApplicationProxy
-ServiceApplication $appSubscriptionService
(Run the following commands if an App Management Service
Proxy does not exist) – NOTE: to ensure an App Management Service and its proxy
are running, from central admin, navigate to Application Management ->
Manage service applications.
$appManagementService =
Get-SPServiceApplication | where-object { $_.displayname -eq "App
Management Service" }
New-SPAppManagementServiceApplicationProxy
-Name "App Management Service Proxy" -ServiceApplication
$appManagementService
(Use the following steps if the central admin wizard has not
been run)
$account = New-SPManagedAccount
$account = Get-SPManagedAccount
"domain\user"
$appPoolSubSvc =
New-SPServiceApplicationPool -Name SettingsServiceAppPool -Account $account
$appPoolAppSvc = New-SPServiceApplicationPool
-Name AppServiceAppPool -Account $account
$appSubSvc =
New-SPSubscriptionSettingsServiceApplication –ApplicationPool $appPoolSubSvc
–Name SettingsServiceApp –DatabaseName SettingsServiceDB
$proxySubSvc =
New-SPSubscriptionSettingsServiceApplicationProxy –ServiceApplication
$appSubSvc
$appAppSvc =
New-SPAppManagementServiceApplication -ApplicationPool $appPoolAppSvc -Name
AppServiceApp -DatabaseName AppServiceDB
$proxyAppSvc =
New-SPAppManagementServiceApplicationProxy -ServiceApplication $appAppSvc
A3-4. App prefix
Set-SPAppSiteSubscriptionName -Name
"app" -Confirm:$false
A4. Creating a new site collection
for App Catalog
From Central Admin, navigate to Apps -> Manage App
Catalog, choose “Create a new app catalog site”, and click OK.
Fill in the required fields on the “Create App Catalog” page
as shown (Fig 3) and click OK to create an App Catalog site.
Figure 3

A5. Turn off the HTTPS requirement
for OAuth during development
From the sharepoint management shell on the target
sharepoint server, enter the following commands.
$serviceConfig =
Get-SPSecurityTokenServiceConfig
$serviceConfig.AllowMetadataOverHttp
= $true
$serviceConfig.AllowOAuthOverHttp =
$true
$serviceConfig.Update()
B. Creating A High-Trust
Provider-Hosted App
The following procedures are a supplement to the article
found on MSDN page http://msdn.microsoft.com/en-us/library/fp179901(v=office.15).aspx.
Where applicable, please refer to the procedures hereafter.
B1. Create a public and private test
certificate
Open IIS Manager, navigate to the top computer node on the
left pane, and on the right pane double-click on the Server Certificates icon.
(Fig 4).
Figure 4

From the Server Certificate screen, choose the “Create
Self-Signed Certificate…” link, Specify a unique name (Fig 5), and click OK.
Figure 5

Right-click the “HighTrustApp” certificate item from the
list on the Server Certificate screen, choose Export. (Fig 6)
Figure 6

Choose a location to export the pfx file to and specify a
password (Fig 7).
Figure 7

On Server Certificates screen, double-click HighTrustApp to
display the certificate details.
Next, on the Details tab, choose Copy to File to launch the
Certificate Export Wizard (Fig 8).
Figure 8

Choose Next.
Use the default value No, do not export the private key. and
then choose Next.
Use the default values. Choose Next.
Choose Browse, name the certificate HighTrustApp, and then
save it in a location of your choice. It is saved as a .cer file. Click the
Finish button to complete exporting of the certificate.
B2. Configure SharePoint 2013 for
server-to-server (S2S) app use and configure trust for your app
Save the following commands to a text file named
RegisterTokenIssuer.ps1. Open Sharepoint Management Shell, navigate to where
RegisterTokenIssuer.ps1 is saved (i.e. cd desktop), run the ps1 file by
executing .\RegisterTokenIssuer.ps1
at the prompt.
$publicCertPath =
"C:\HighTrustApp.cer"
$IssuerName = "TestApp"
$issuerId = [System.Guid]::NewGuid().ToString()
$spurl
="http://10.7.8.161/sites/dev"
$spweb = Get-SPWeb $spurl
$realm = Get-SPAuthenticationRealm
-ServiceContext $spweb.Site
$certificate = Get-PfxCertificate
$publicCertPath
New-SPTrustedRootAuthority -Name
$IssuerName -Certificate $certificate
$fullIssuerIdentifier = $issuerId +
'@' + $realm
$tokenIssuer = New-SPTrustedSecurityTokenIssuer
-Name $issuerId -Certificate $certificate -RegisteredIssuerName $fullIssuerIdentifier
–IsTrustBroker
$appPrincipal = Register-SPAppPrincipal
-NameIdentifier $fullIssuerIdentifier -Site $spweb -DisplayName $IssuerName
Set-SPAppPrincipalPermission
-appPrincipal $appPrincipal -Site $spweb -Right "READ" -Scope
"Site"
write-host "--- ### Results
### ---" -ForegroundColor Green
write-host " Realm:
$realm" -ForegroundColor Green
write-host " IssuerID:
$issuerId" -ForegroundColor Green
write-host " TokenIssuer: $tokenIssuer"
-ForegroundColor Green
write-host "--- ### Results
### ---" -ForegroundColor Green
Note the IssuerID from the console output, you will need
this GUID value later for setting up the app.
NOTE:
- All references to GUID values (i.e. from powershell commandlets, web.config, appmanifest.xml) must be lowercase.
- All references to GUID values (i.e. from powershell commandlets, web.config, appmanifest.xml) must be lowercase.
- If you're doing remote development where Visual
Studio 2012 and SharePoint 2013 are not installed on the same computer, the
root site collection must be created from a Developer Site template. It's
required. If Visual Studio 2012 and SharePoint 2013 are installed on the same
computer, it isn’t required.
If, for some reason, the above command executions did not
succeed and you need to remove the root authority and the token issuer, execute
the following command line by line to view the properties.
Get-SPTrustedRootAuthority |
Where-Object {$_.DisplayName -eq "TestApp"}
Get-SPTrustedSecurityTokenIssuer
Note the GUID Id values for the Root Authority and Token
Authority. Execute the following commands line by line. Replace the GUID value
in the example with ones observed above.
Remove-SPTrustedRootAuthority -Identity
"xxxxxxxx-xxxx-xxxx-xxxx-xxxxxxxxxxxx"
Remove-SPTrustedSecurityTokenIssuer
-Identity "xxxxxxxx-xxxx-xxxx-xxxx-xxxxxxxxxxxx"
B3. Create a provider-hosted app
1.
Open Visual Studio 2012. Using the top menu on
the IDE, create a new project by choosing FILE -> New Project…
2.
Select “App for SharePoint 2013” as shown in Fig
9, specify a project name, and click OK.
Figure 9

3.
On the New App for Sharepoint dialog, fill in
the fields as shown in Fig 10. Click the Validate button to ensure connectivity
to the server. Click “Finish” when the dialog is complete.
Figure 10

4.
Add a MVC project to the solution. As an
example, we are going to download a sample MVC project and extract the files
and folder to the solution folder as shown in Fig 11.

5.
Right-click the solution node from the Solution
Explorer and select Add -> Existing Project…, browse to the BasicMVC.csproj
located in the project folder to add the project to the solution.
6.
Select the TestApp project node from the
Solution Explorer to show its properties below the solution Explorer. Change
the Web Project property to BasicMVC as shown in Fig 12.
Figure 12

7.
Copy the TokenHelper.cs from the TestAppWeb project to the root of
BasicMVC project as show in Fig 13. Change the namespace in TokenHelper.cs to BasicMVC
as shown in Fig 14.
Figure 13

Figure 14

8.
Right-click on the TestAppWeb project and choose
Remove to remove it from the solution.
9.
Add the following assemblies as references to
the BasicMVC project.
Assembly
Name
|
Path
|
Microsoft.IdentityModel
|
C:\Program Files\Reference
Assemblies\Microsoft\Windows Identity
Foundation\v3.5\Microsoft.IdentityModel.dll
|
Microsoft.IdentityModel.Extensions
|
C:\Windows\Microsoft.NET\assembly\GAC_MSIL\Microsoft.IdentityModel.Extensions\v4.0_2.0.0.0__69c3241e6f0468ca\Microsoft.IdentityModel.Extensions.dll
|
Microsoft.SharePoint.Client
|
C:\Windows\Microsoft.NET\assembly\GAC_MSIL\Microsoft.SharePoint.Client\v4.0_15.0.0.0__71e9bce111e9429c\Microsoft.SharePoint.Client.dll
|
Microsoft.SharePoint.Client.Runtime
|
C:\Windows\Microsoft.NET\assembly\GAC_MSIL\Microsoft.SharePoint.Client.Runtime\v4.0_15.0.0.0__71e9bce111e9429c\Microsoft.SharePoint.Client.Runtime.dll
|
System.IdentityModel
|
C:\Program Files (x86)\Reference Assemblies\Microsoft\Framework\.NETFramework\v4.5\System.IdentityModel.dll
|
System.ServiceModel
|
C:\Program Files (x86)\Reference
Assemblies\Microsoft\Framework\.NETFramework\v4.5\System.ServiceModel.dll
|
10.
Right-click on the BasicMVC project node from
the Solution Explorer, choose Properties, and make changes to the following
properties.
From
Web tab -> Start Action section, change the radio button seletion to “Don’t
open a page. Wait for a request from an external application” as shown in Fig 15.
Figure 15

11.
Select the BasicMVC project node from the
Solution Explorer, under the Properties window, change Anonymous Authentication
to Disabled, and Windows Authentication to Enabled, as shown in Fig 16.
Figure 16

12.
Modify the AppManifest.xml file from the TestApp
project as shown in the highlighted areas.
<?xml version="1.0" encoding="utf-8" ?>
<App xmlns="http://schemas.microsoft.com/sharepoint/2012/app/manifest"
Name="TestApp"
ProductID="{6cf090bb-6ed9-4954-b2fc-b012e3f767f6}"
Version="1.0.0.0"
SharePointMinVersion="15.0.0.0">
<Properties>
<Title>TestApp</Title>
<StartPage>~remoteAppUrl/Home?{StandardTokens}</StartPage>
</Properties>
<AppPrincipal>
<RemoteWebApplication ClientId="6569a7e8-3670-4669-91ae-ec6819ab461" />
</AppPrincipal>
<AppPermissionRequests>
<AppPermissionRequest Scope="http://sharepoint/content/sitecollection/web" Right="Read" />
</AppPermissionRequests>
</App>
13.
Modify the web.config file from the BasicMVC
project as shown in the highlighted areas. Add new elements to the appSettings
node. Modify the authentication node and add customErrors node as shown. Note
the IssuerID in the appSettings section. This is a GUID value generated
previously when a Token Issuer is registered.
<?xml version="1.0"?>
...
<appSettings>
...
<add key="ClientId" value="6569a7e8-3670-4669-91ae-ec6819ab461" />
<add key="ClientSigningCertificatePath" value="C:\HighTrustApp.pfx" />
<add key="ClientSigningCertificatePassword" value="password"
/>
<add key="IssuerID" value="xxxxxxxx-xxxx-xxxx-xxxx-xxxxxxxxxxxx" />
</appSettings>
...
<system.web>
<httpRuntime targetFramework="4.5"/>
<compilation debug="true" targetFramework="4.5"/>
<customErrors mode="Off" />
<authentication mode="Windows"/>
<pages controlRenderingCompatibilityVersion="4.0">
<namespaces>
...
</namespaces>
</pages>
...
</system.web>
...
<system.serviceModel>
<bindings>
<basicHttpBinding>
<!--Used by app for SharePoint-->
<binding name="secureBinding">
<security mode="Transport"
/>
</binding>
</basicHttpBinding>
</bindings>
<protocolMapping>
<add binding="basicHttpBinding" scheme="https" bindingConfiguration="secureBinding" />
</protocolMapping>
</system.serviceModel>
</configuration>
14.
Run the project from Visual Studio 2012. This
will connect to the remote Sharepoint server and install the app on the
Sharepoint instance. Use SP2013\administrator when prompted for a credential.
15.
When the browser launches, a screen appears
asking to trust the app (Fig 17). Click Trust It. This will redirect to the
Site Settings page of /sites/dev/. Click on the Site Contents link on the left
pane. An icon for the app just installed will have appeared on the Site Contents
page (Fig 18). Click on the app icon link to launch the app. Note that once the
app launches, it will run as a localhost site hosted on IISExpress of Visual
Studio 2012.
Figure 17

Figure 18

C. Deploying provider-hosted app to
IIS and to the Sharepoint App Catalog
C1. Generate App secret and register
new app on sharepoint
2.
Fill out the App Id field with the ClientId from
the appSettings section of the web.config file for the BasicMVC project.
3.
Using the Generate button beside the Client
Secret field, generate a new client secret value, which will be used later in
the web.config of the app.
4.
Fill out the remaining fields as shown on Fig
19, and click the Create button.
Figure 19

C2. Publish the app to be deployed to
target Sharepoint instance
1.
Modify the AppManifest.xml file from the TestApp
project as shown in the highlighted areas.
<?xml version="1.0" encoding="utf-8" ?>
<App xmlns="http://schemas.microsoft.com/sharepoint/2012/app/manifest"
Name="TestApp"
ProductID="{6cf090bb-6ed9-4954-b2fc-b012e3f767f6}"
Version="1.0.0.0"
SharePointMinVersion="15.0.0.0">
<Properties>
<Title>TestApp</Title>
<StartPage>http://10.7.8.161:2220/Home?{StandardTokens}</StartPage>
</Properties>
<AppPrincipal>
<RemoteWebApplication ClientId="6569a7e8-3670-4669-91ae-ec6819ab461" />
</AppPrincipal>
<AppPermissionRequests>
<AppPermissionRequest Scope="http://sharepoint/content/sitecollection/web" Right="Read" />
</AppPermissionRequests>
</App>
2.
Modify the web.config file from the from the
BasicMVC project as shown in the highlighted areas. Add a new element to the
appSettings node for ClientSecret.
<?xml version="1.0"?>
...
<appSettings>
<add key="webpages:Version" value="2.0.0.0"/>
<add key="webpages:Enabled" value="false"/>
<add key="PreserveLoginUrl" value="true"/>
<add key="ClientValidationEnabled" value="true"/>
<add key="UnobtrusiveJavaScriptEnabled"
value="true"/>
<add key="ClientId" value="6569a7e8-3670-4669-91ae-ec6819ab461" />
<add key="ClientSecret" value="dRCFD0uy7Genqj0QnGhaef4Mzazw8jofzgEdkcLG5yI=" />
<add key="ClientSigningCertificatePath" value="C:\HighTrustApp.pfx" />
<add key="ClientSigningCertificatePassword" value="password" />
<add key="IssuerID" value="xxxxxxxx-xxxx-xxxx-xxxx-xxxxxxxxxxxx" />
</appSettings>
...
</configuration>
3.
Right-click the TestApp project node from the
Solution Explorer and choose “Publish…”. Type in a profile name “HighTrustApp”,
click Next.
4.
Type in a URL for the website host, and Client
ID as shown in Fig 20. Note that the URL textbox shown only allows https as
prefix. This will not affect the resulting app code being built. Click Next to
go to the next screen. Ensure that the “Open output folder after successful
packaging” option is checked and click Finish to build and package the app code
(Fig 21). The bin\Debug\app.publish folder will open to shown the built
packaged files.
Figure 20

Figure 21

C3. Configure Windows Firewall to
allow inbound TCP traffic
1.
The use of an assigned port for this test app
necessitates the creation of an inbound traffic rule in the Windows firewall
settings from the target Sharepoint server computer to allow TCP traffic
through port 2220 . From the target Sharepoint server computer, navigate to
Start menu -> All Programs -> Administrative Tools -> Windows Firewall
with Advanced Security. Once the applet opens, right-click on the Inbound Rules
node on the left pane and choose “New Rule…” (Fig 22)
Figure 22

2.
On the New Inbound Rule Wizard’s Rule Type
screen, Select “Port” and click Next.
3.
On the Protocol and Ports screen, select TCP for the rule, and Specify local
ports 2220 in the textbox.
4.
On the Action screen, ensure that “Allow the
connection” is selected. Click Next.
5.
On the Profile screen, leave the default options
checked and click Next.
6.
On the Name screen, type in “Inbound port 2220”
for the Name field, and click “Finish”.
C4. Create an IIS Web Site and
configure its security settings
1.
From the target Sharepoint server computer,
navigate to Start menu -> All Programs -> Administrative Tools -> Internet
Information Services (IIS) Manager to open the IIS Manager.
2.
On the left pane of IIS Manager window, expand
the top level computer node, and expand the Sites node. Right-click on the
Sites node and choose “Add Web Site…” (Fig 23).
Figure 23

3.
Fill in the fields as shown in Fig 24. Create a
physical folder if necessary. Click OK to create the web site.
Figure 24

4.
Right-click on the TestApp and choose “Edit
Permissions…” as shown in Fig 25.
Figure 25

5.
From the TestApp Properties window (Fig 26),
navigate to the Security tab. Ensure that the NETWORK SERVICE (Full Control)
and IIS_IUSRS (read/execute default permissions) users are added to the “Group
or user names” list. Use the “Edit…” button to add the users if necessary.
Figure 26

6.
From IIS Manager, double-click on the TestApp
node from the left Connections pane. Click on the Authentication button from
the Features View (Fig 27). Ensure that Anonymous authentication is disabled
and Windows Authentication is enabled (Fig 28).
Figure 27

Figure 28

7.
From the bin\Debug\app.publish folder that was
open previously, extract the file content from the following path in the TestApp.Web.zip
file to the virtual folder of the TestApp web site (c:\Apps\TestApp) on the
Target sharepoint computer.
Content\C_C\TestProjects\TestApp\BasicMVC\obj\Debug\Package\PackageTmp
8.
Navigate to the web.config file on the virtual
folder of TestApp. Ensure the following highlighted appSetting values are in
place.
<?xml version="1.0"?>
...
<appSettings>
<add key="webpages:Version" value="2.0.0.0"/>
<add key="webpages:Enabled" value="false"/>
<add key="PreserveLoginUrl" value="true"/>
<add key="ClientValidationEnabled" value="true"/>
<add key="UnobtrusiveJavaScriptEnabled"
value="true"/>
<add key="ClientId" value="6569a7e8-3670-4669-91ae-ec6819ab461" />
<add key="ClientSigningCertificatePath" value="C:\HighTrustApp.pfx" />
<add key="ClientSigningCertificatePassword" value="password" />
</appSettings>
...
9.
Test the TestApp web site by browsing to http://10.7.8.161:2220
to ensure it runs on its own.
C5. Add App to App Catalog and to
target site on Sharepoint
1. Remove
the existing TestApp on the Site Contents page from http://10.7.8.161/sites/dev
(Fig 29).
Figure 29

NOTE: if removing the app is
unsuccessful, close the browser and log in as SP2013\administrator.
2.
Browse to the App Catalog created previously at http://10.7.8.161/sites/apps.
On the left pane, click “Apps for Sharepoint”.
3.
From the App for Sharepoint screen, click “new
app” (Fig 30).
Figure 30

NOTE: if you cannot see the “new app” link button,
close the browser and log in as SP2013\sp_farm.
4.
From the Add a document dialog box, browse to
bin\Debug\app.publish folder from the TestApp project folder, and browse to the
TestApp.app file as shown in Fig 31. Ensure that the “Add as a new version to
existing files” option is checked, and click OK.
Figure 31

5.
When the App for Sharepoint – TestApp.app screen
appears, accept the default entries by clicking the “Save” (Fig 32).
Figure 32

6.
Navigate to http://10.7.8.161/sites/dev ->
Site Contents. Click the “add an app” icon (Fig 33).
Figure 33

7.
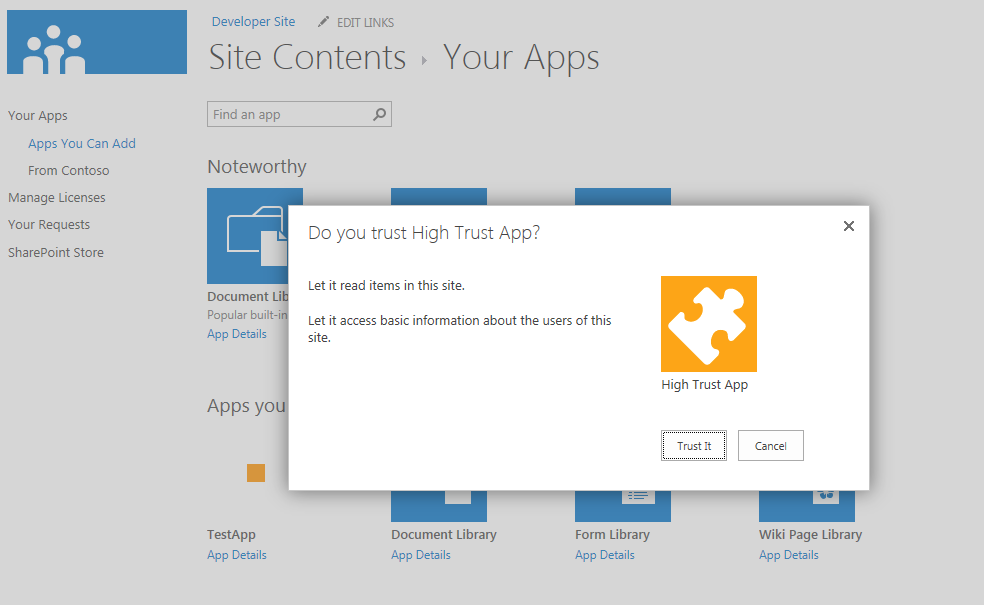
From the Site Contents -> Your Apps screen,
click TestApp icon shown, and click the Trust It button from the popup box (Fig
34).
Figure 34
NOTE: if sharepoint throws an error after adding
the app, close the browser and log back in as SP2013\administrator.
8.
The app will now be added to the Site Contents
page. Click on the TestApp icon to launch the app.
My app returned error: (401) Unauthorized after clicked "Trust it" and it show that error page. What I have to do to solve this? Thank's in Advance
ReplyDeleteIf you're logged in as farm admin, SP won't let you add an app. Log in to the site as a site collection admin, and you should be able to add the app to the site, provided you have set up the app properly as detailed in this guide. SP is extremely particular when it comes to how the app model works.
DeleteThis comment has been removed by the author.
DeleteGud one bro.but i cannot able to find Microsoft.Identitymodel.extension in the path you mentioned.I am using win7 and visual studio 2012 trying to deploy in office 365
ReplyDeleteThanks,
Gans
You need to install Windows Identity Foundation. This can be done by either getting it on its own or through your project nuget package manager.
DeleteI am getting below error can you please guide me:
ReplyDeleteMixed Content: The page at 'https://localhost:44300/Pages/Default.aspx?SPHostUrl=http%3A%2F%2Finhydsp20…D02513030647b1b%2Esp2013TP01app%2Ecom%2Fsites%2FAppDev%2FJSOMCRUDOnPremise' was loaded over HTTPS, but requested an insecure script 'http://inhydsp2013tp01/sites/AppDev/_layouts/15/sp.runtime.js?_=1439967788585'. This request has been blocked; the content must be served over HTTPS.
You must either use a plain IP address or a domain name in your URL.
DeleteWow, fantastic blоg layout! How long have you been blоgging foг?
ReplyDeleteyou madе blogging lοοk eaѕy.
The οvеrall lоok οf уour website іs
great..
sharepoint solution providers